By Sophie De Coppel, Hans Tierens
Deploying your Machine Learning model is often the cherry on the cake
for a Machine Learning Engineer. After putting a lot of effort in building
your model, it is immensely satisfying to be able to send it off on an
adventure of its own, hoping it conquers the world. However, the size of the
world is vast, so we better equip our model with a quick and able ride. The
question of whether to build our own horse in the cloud or borrow
someone else’s horse for the trip?
I recently faced this question myself when looking for an easy way to host a
demo of my application and share it within my company and, by
extension, the world. Luckily, I found a readily-saddled noble steed in
the HuggingFace community stables. (We all knew HuggingFace as a
friendly-emoji-branded platform/community that offers open-source
solutions to explore, train, borrow and fine-tune deep learning models.
Recently, HuggingFace also provides us with a platform to build and host
our own cool applications. Let’s take you with me on how I mounted my
app, dug my spurs in and rode the HuggingFace parade-horse, Space,
to the horizon.
- Decide to go on an adventure: train a cool model
First off, you need to have a model to showcase. For me, that was the
easiest part. During my AI-internship at dataroots, I developed and trained
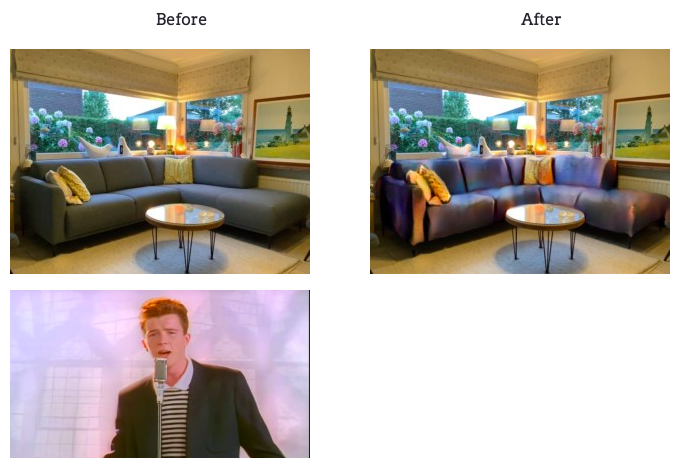
a segmentation model that detects sofas on images and then changes their style, using a Style-Transfer model, extracting the style from a general image.
I baptized the model: SofaStyler (about which you can read more here).
After developing my deep learning model, I needed a good way to
showcase it to the company. I figured that the best way to showcase my
model was to allow my colleagues to explore and play around with the model.
Note to myself: remember it is always fun to see your model being used for what it is supposed for... and having it's limits tested in the most creative ways:
All frolicking aside, I needed my demo to be practical and interactive, and I needed it quickly! Being a machine learning engineer and not a front-end developer, I wanted to avoid turning and twisting the knobs of HTML and CSS. Luckily, that’s exactly what your options are for your HuggingFace Space; it integrates perfectly with both Streamlit and Gradio.
2. Getting starting directions: creating a HuggingFace Space
Next, we create our own HuggingFace Space, which requires only as much
as signing up for an account via https://huggingface.co/join, and creating your own Space.
The only knobs to turn here are:
- giving your space a name
- choosing an SDK for the front-end
- choosing whether to immediately make your space available to the public or not.

Your HuggingFace Space is basically a Git-repository for hosting your model. You only need to add the following files to make it run smoothly:
- A requirements.txt file containing all packages to (pip) install to make sure all model dependencies are covered.
- A (few) folders containing your saved models (or model checkpoints) and some Python files to be used for making predictions/using the model. You can skip this step if your model is available on PyPi.
- An app.py file to design and launch your application. HuggingFace Spaces will automatically host your model using this file.
So, let's dig deeper in what creating this app.py file actually entails:
3. Taking your first steps: building the front-end
I started off building my application with Gradio, an open-source python library which allows you to create front-end UIs for your application in just a few lines of code. There are many tutorials available online, but the image below shows how easy it really is.
- You import gradio and all model functions to use your model (from the provided files).
- You define a prediction function that uses your model to some input data.
- You define the interface which applies the prediction function to some input data. In this, you are basically building an interface to facilitate users to (1) feed the input data into the model and (2) define what the output should look like.
- Finally, you launch the interface by just calling the launch() method on your interface.

HuggingFace immediately deploys your application as you drop the app.py file in your file repository. It is really that easy!
Below you can see a demo of the front-end that I build for my own SofaStyler application.
I already told your that your HuggingFace Space was basically a Git-repository for hosting your model. Well, if it walks like Git and it talks like Git, it’s probably Git. As such, it’s quite easy to maintain your HuggingFace Space (in a CI/CD way) from Github using GitHub Actions, treating your HuggingFace Space as a remote to your existing Git repository.
4. Dig your spurs and off you go-oh-oh-oh!
I just created a demo application for my model which everyone can immediately interact and play around with it! Such a great feeling! HuggingFace takes care of all the rest!
In the back, HuggingFace provides you a compute instance with 8CPU cores and 16GB of RAM, entirely free of cost! Hence, you are fully equipped to ride fast into the horizon… but maybe not that far…
There are some limitations to using HuggingFace Space compute instances. Any interactive job submitted through the interface gets exactly 1 minute of computing time before your oh-so-noble steed bucks and throws you out of the saddle!
This one-minute time-out can be avoided by allowing jobs to queue up. This queueing process, however, comes at the cost of much higher latency of your application as concurrent users of your app will find their jobs run sequentially through the compute. It's needless to say that popular apps might start to face quite some waiting time.
How about putting our inference on GPU-steroids? The answer, my friend, is yes we can! Well, you can if you have a paid subscription. Upon request, you can get yourself a T4 GPU to be used on a case-by-case basis. So you can be sure that your application will run blazingly fast! This increased the horsepower of our application up to six times!
Alas, so it will your bill. HuggingFace provisions the GPU to any single space you like for a whopping $150 per month (paid up front)! You read it well: to any single space. This means you can nor share GPU power among multiple spaces or applications, nor reassign it to another space at will. So for each space you want to put on steroids, you will need to cough up quite the budget each month. So you better make sure your app conquers the world quickly with heavy usage to get your money’s worth!
In the end, I still love the way HuggingFace is making it possible to easily develop a user interface for my models and to host these models free of cost. It's a great way to get models out of your Git-repos and show what they are capable of!
Try out the SofaStyler app (on steroids during June 2022) using the link below: