

By Sophie De Coppel, Hans Tierens
Do you want to restyle or redesign your interior, but don't want to leave the comfort of your own home? Don't fancy reading through hundreds of interior design albums or going to your local furniture store to try imagining those couches in your own living room? Have you always dreamed of a couch with an extravagant tiger print, but you don't know if it will fit your interior? Well I got a thing for you!
During my internship at dataroots, I have built an AI-driven application, SofaStyler, which allows you to add different colors or patterns to an image of your couch. You can just take a picture of your living room and can start styling your couch to your wildest dreams!
The app is available through our HuggingFace Space:
In this blogpost, I will explain how I designed this model and how it works. Our AI interior design model consists of two main steps:
- The first step is to detect a sofa in your living room. For most applications, object detection models can help a great deal, drawing a bounding box around our sofas. However, our design requires to be much more specific; we are interested in pixel-level detection of a sofa. This is done by using a technique called image segmentation, where a computer vision model is specifically trained to detect which pixels depict (parts of) your couch.
In this way, we end up with a mask (binary representation of couch vs. non-couch pixels) allowing us to create a cut-out of the sofa to stylize, as well as the exact location in which we need to paste the restyled sofa back in your original living room. - The second step is to style your sofa with a general pattern or color. For this, we use a technique called style transfer. This technique intelligently combines the content (sofa) with the style and/or texture of a different image. A subsequent optimization exercise ensures you will result in a style-transferred sofa and not a blob of new where you would expect a sofa to appear.
Let's tackle each of these models one-by-one:
Data Data Data
Before we can even start training an image segmentation model, we need some good training data. More specifically, we need good labeled training data. Labelling images for image segmentation requires to construct masks; color-coded pixel-by-pixel areas which distinguish one object from another. Creating such masks is a very time-intensive venture. So rather than constructing a database ourselves, we searched for an existing dataset. I made use of the 3D-FUTURE: 3D FUrniture shape with TextURE dataset created by Fu et al., 2021, available upon request from Alibaba Cloud. This dataset was used for the Alibaba 3D Artificial Challenge Workshop in 2020 and consisted of 20,240 images of virtual indoor spaces, of which approximately 10,000 contain a sofa. Even though 3D-rendering of images was way beyond my purpose and scope, I could use the dataset since all images were labeled for instance segmentation, meaning that each piece of furniture (instance) got its own color-coded label and mask, using the COCO-format.
When we received the dataset it had the following directory structure:
3D-FUTURE-scene.zip
├── train
│    ├── image
|    │    ├── 0000000.jpg
|    │    ├── 0000001.jpg
│    │    ├── ...
│    │
│    └── idmap
|         ├── 0000000.png
|         ├── 0000001.png
│         ├── ...
│
├── test
│    ├── image
|    │    ├── 0000000.jpg
|    │    ├── 0000001.jpg
│    │    ├── ...
│    │
│    └── idmap
|         ├── 0000000.png
|         ├── 0000001.png
│         ├── ...
│
└── GT
     ├── model_infos.json
     ├── train_set.json
     └── test_set.json
The train and test folder each contain two subfolders: an image folder, which contains all original images and an idmap folder which contains color coded images that segment all furniture objects in the images. Beware, this image is different from the annotation files, which will lead to problems that we will discus later on. Further, the ground truth (GT) folder contains all the actual annotation files we will use. The first file in this folder, model_info.json, describes the style, theme, material, and category of each furniture, except lights. We will not use this file as the style of the original furniture is not of interest for this project. Then, the train_set.json and test_set.json files are based on the COCO format and describe the categories, images and annotations. They fit the following format:
train_set.json / test_set.json:
{
categories: [
{
id: int,
category_name: str,
fine-grained category name: str,
},
...
]
images: [
{
id: int,
width: int,
height: int,
file_name: str,
},
...
],
annotations: [
{
id: int,
image_id: int,
category_id: int,
segmentation: RLE or [polygon],
area: float,
bbox: [x,y,width,height],
model_id: str,
texture_id: str,
pose: list
fov: float,
style: str,
theme: str,
material: str
},
...
],
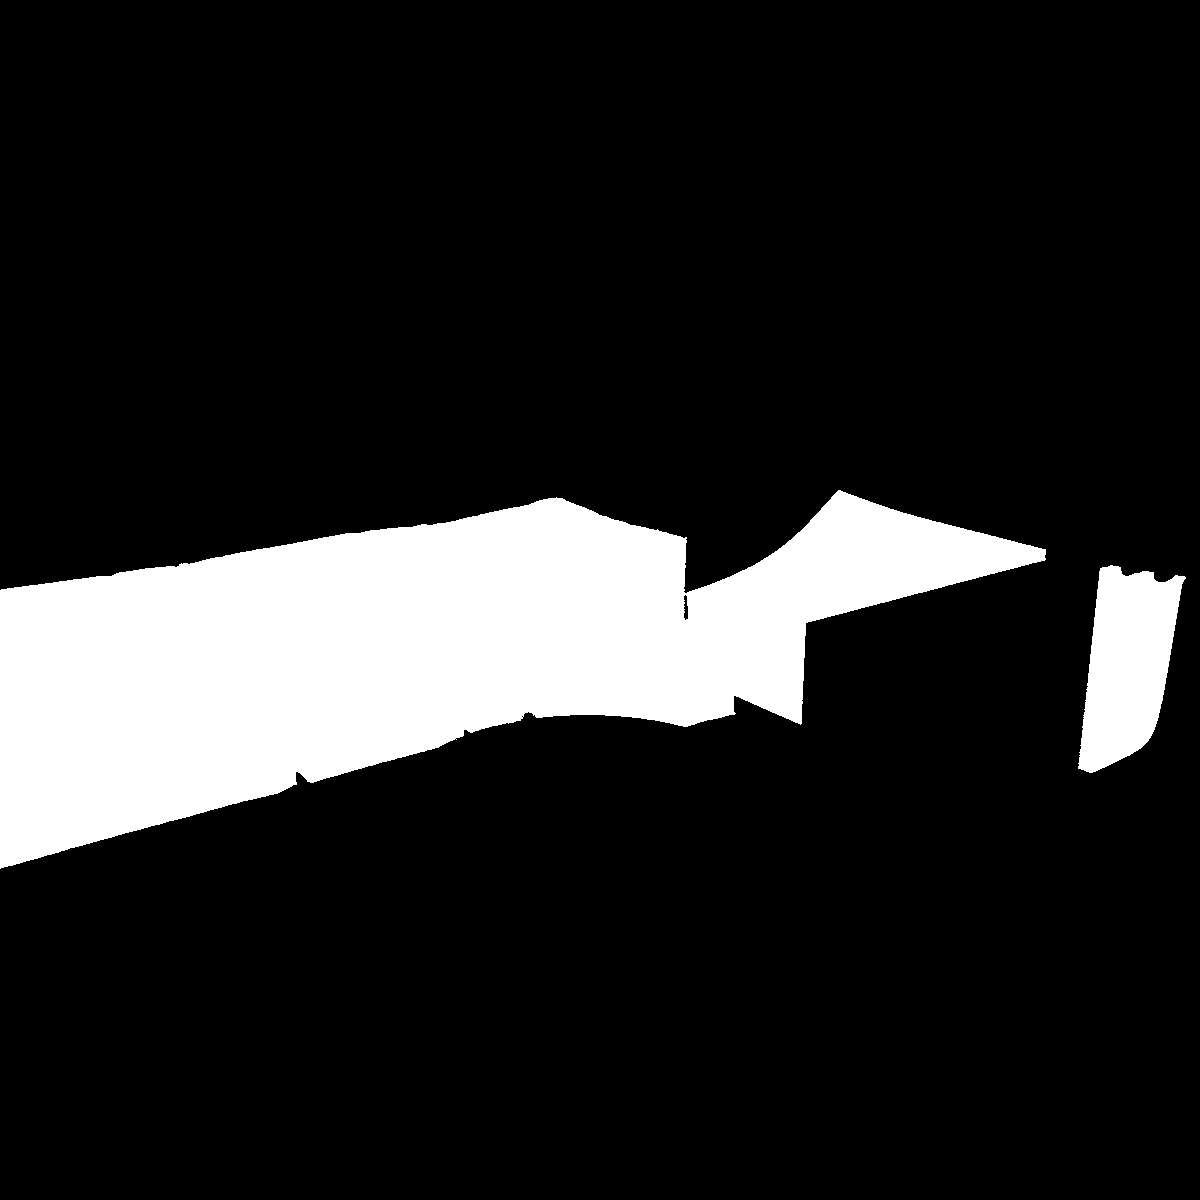
}Here, our main focus lies on the annotations in these files. They can be thought of as a table where each entry represents a furniture object. For this object we get the id of the image where it appears, the category id of the object (armchair sofa, kingsize bed, ...), the segmentation polygon and a whole lot of extra info we won't use. Now, by accessing the annotations of the training and testing data with the helpful Pycocotools package, we can select all images in the dataset that contain a sofa and visualise their binary masks, as shown by the code below:
import numpy as np
from pycocotools.coco import COCO
from pycocotools import mask as coco_mask
from PIL import Image
# Read the annotation file
coco = COCO('train_set.json')
# Get all subcategories that fall under the category 'Sofa'
cat_ids = coco.getCatIds(catNms = 'Sofa')
# Get all image ids that contain a sofa
img_ids = [coco.getImgIds(catIds = cat_id) for cat_id in cat_ids]
### Let us now visualise the binary mask for the first image
img_id = img_ids[0]
# Obtain all of the annotations ids in the image
ann_ids = coco.getAnnIds(imgIds=img_id)
# Get the objects from these annotation ids
targets = coco.loadAnns(ann_ids)
# Get the file name and measurements
file_name = coco.loadImgs(img_id)[0]["file_name"]
img_w, img_h = (
coco.loadImgs(img_id)[0]["width"],
coco.loadImgs(img_id)[0]["height"],
)
# Select only the masks from the sofas
masks = np.zeros((img_w, img_h), dtype=np.uint8)
for target in targets:
if target["category_id"] in cat_ids:
# Get object polygons and convert them to a mask
polygons = target["segmentation"]
rles = coco_mask.frPyObjects(polygons, img_h, img_w)
mask = coco_mask.decode(rles)
if len(mask.shape) < 3:
mask = mask[..., None]
mask = mask.any(axis=2)
# Add all masks together into a binary mask
masks[mask] = 1
# Convert the mask to an image
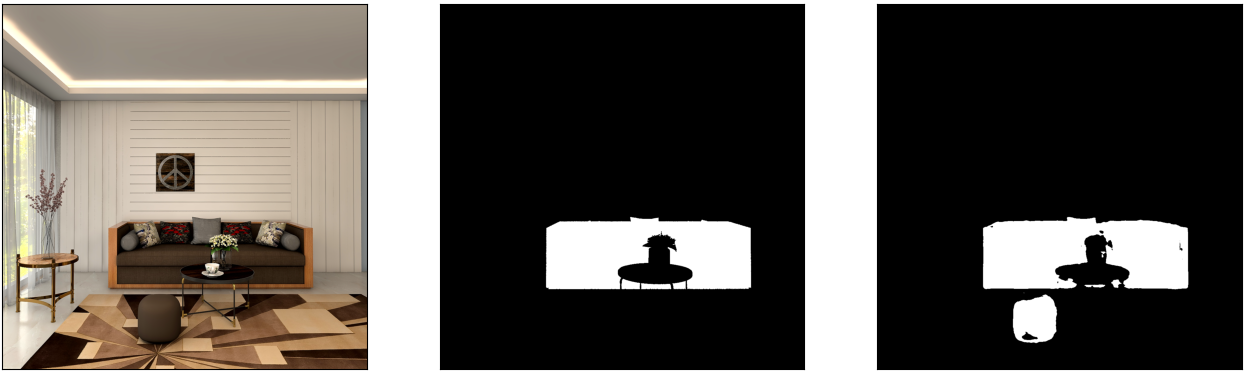
mask = Image.fromarray(masks)This code generates the mask below:
Now, there can of course never be a rainbow without some rain. So, unfortunately, we noticed some problems in the data during exploring and training.
First of all, we saw that the supplied annotation files weren't always complete. There seems to be a discrepancy between the instance segmentation visualized in the ID map of each image and the actual masks supplied in the annotation files. This problem seemed to occur in about 10% of the images.
Even though the ID maps seemed to be correct, reconstructing the COCO-style annotation files was impossible because color coding seemed to be inconsistent across images (e.g., a sofa could be colored using some green hue on one picture, while another sofa could be masked using a purplish hue on the other).
So as much as we tried to escape it, some manual curation of the training data was still necessary. After carefully pruning a random selection of the images, we constructed a clean dataset of around 2000 images for training and validation.
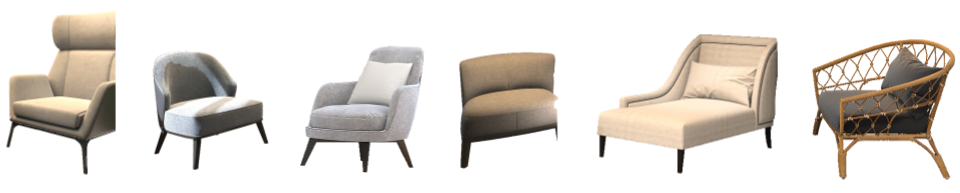
Soon, a second problem popped up. The distinction between sofas and chairs, originally two different categories in the instance segmentation dataset, was very vague and often inconsistent.
For example, take a look at the images below. Can you distinguish between the two?
Solution
The first three are labelled as chairs, while the last three are labelled as couches.
Nevertheless, since my own brain still struggles to distinguish between the two, and the model will always be biased towards the human labelling, we allowed for this little imperfection.
What is a "sofa"?
Now that we have the necessary tools, let us build our interior design assistant! Don't get too enthusiastic though and start programming in the name of speed. A few Google searches teach us that several people encountered and solved this problem before us. And, as probably every programmer would do, I listened to the lazy voice in the back of my head: "Why build something new from scratch if somebody already did it better?".
This nifty technique is called transfer learning and thanks to the extensive segmentation-models package by Pavel Yakubovskiy, we can arm our model with pre-trained knowledge from ImageNet. This PyPI package offers a wide variety of model architectures and backbones. We decided to focus on the U-net architecture, known for its success in biomedical computer vision tasks by using a encoder-decoder structure with skip connection between the two. In the encoder part, the image will be encoded as a feature vector. We lend this representations from common classification models, which are referenced as the backbones. As backbone, we experimented with a few different flavours such as Resnet, Efficientnet, Mobilnet and Densenet. The decoder part will then upsample the feature vector back into an image. The skip connections between these two parts help to refine the segmentation masks.
When constructing our model, we also have to define the optimizer, activation function, loss function and evaluation metrics. During the setup of our model I payed extra attention to the extensibility of the code, such that it is generic enough to be applicable to the segmentation of more classes. This resulted in the code as seen below.
First of all, the amount of classes is determined and increased by one in the case of multiclass segmentation, since the background is added as an extra class. As activation function, we use the sigmoid activation in the binary case and extend it to the softmax function in the multiclass case. Furthermore, we choose the popular Adam optimizer because it combines the advantages of the adaptive gradient algorithm and the root mean square propagation. As a loss function, we use a combination of a dice loss and a focal loss. The former handles data imbalance and lets us set custom weights for the different classes. This was not necessary in our application but left as an option for further extension to more classes. The later then helps to focus on classes that are harder to predict. In the case of binary segmentation, we use the binary focal loss, which generalises binary cross-entropy by introducing a hyperparameter called the focusing parameter that allows hard-to-classify examples to be penalized more heavily relative to easy-to-classify examples. The weighting of these two loss functions can also be set by the users desire. Finally, as metrics for accuracy, we use the Intersection over Union percentage and the F1 score. The IoU score is interesting because it is very intuitive and the F1 score is important because it is not disturbed by class imbalance.
import segmentation_models as sm

# Define our segmentation model
classes = ['Sofa']
n_classes = 1 if len(classes) == 1 else (len(classes) + 1)

# Define the activation function
activation = "sigmoid" if n_classes == 1 else "softmax"

# Pick a backbone
backbone = 'Resnet50'

# Create the Unet model
model = sm.Unet(backbone, classes=n_classes, activation=activation)

# Define the optomizer
optim = keras.optimizers.Adam(LR)

# Define a loss function
dice_loss = sm.losses.DiceLoss()
focal_loss = (sm.losses.BinaryFocalLoss() if n_classes == 1
				else sm.losses.CategoricalFocalLoss())
total_loss = dice_loss + (1 * focal_loss)

metrics = [sm.metrics.IOUScore(threshold=0.5),
		   sm.metrics.FScore(threshold=0.5)]

# Compile the model with the defined optimizer, loss and metrics
model.compile(optim, total_loss, metrics)
Before we start training, we have to be aware that these models have a huge parameters space that easily overshadows our small dataset (especially if we only train on the correctly labelled subset we made). Consequently, we use data augmentation techniques including crops, noise addition, scaling, shifting, rotating, mirroring and more. This allows us to synthetically enlarge our dataset. Additionally, we also implemented an exponentially decreasing learning rate scheduler and early stopping criterion (on the validation accuracy) to avoid overtraining.
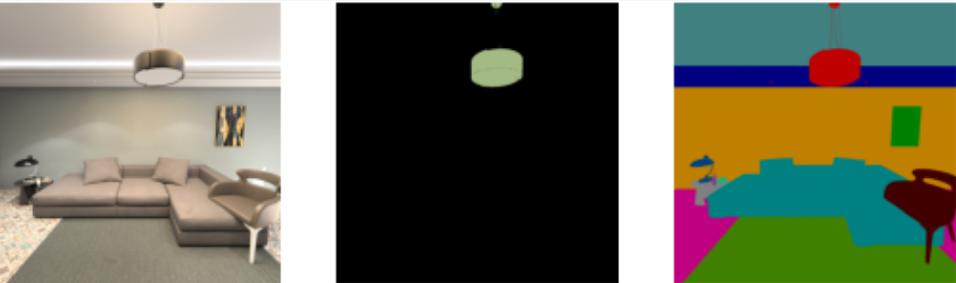
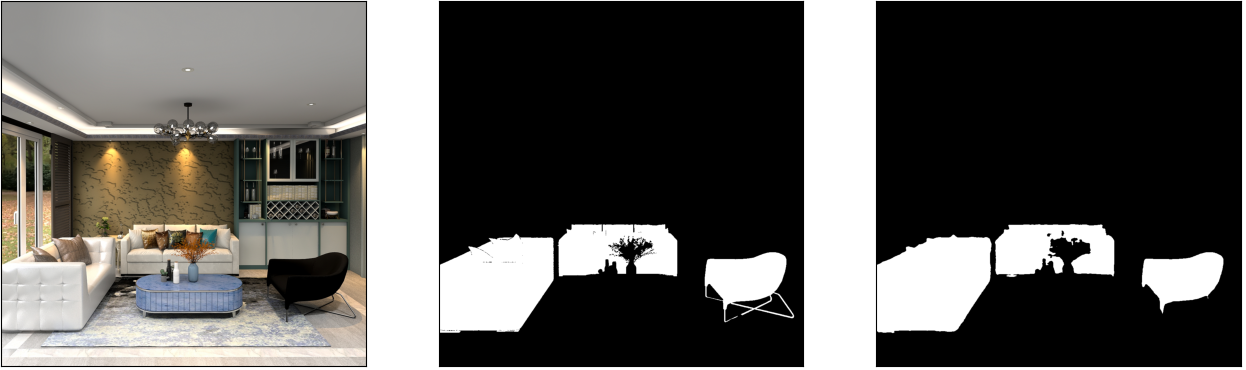
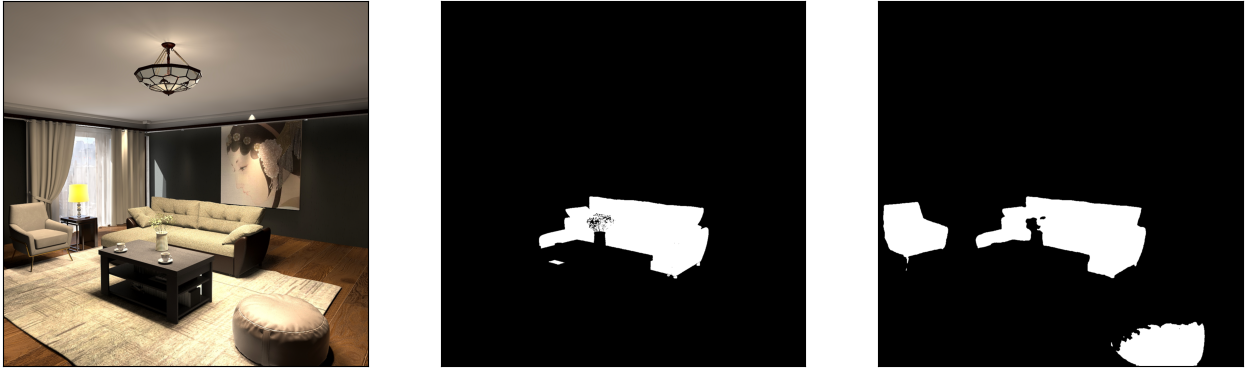
The combination of these techniques then results in a Resnet50 model trained for 20 epochs on our small subset with a validation F1-score of 88%. In the below visualisation (of images in the validation set) we can see that the model behaves quite well, but still struggles with chairs and cushions. Although the model can probably be improved even more by further cleaning the data and training for longer, this seemed as a good starting point for our AI assistant.
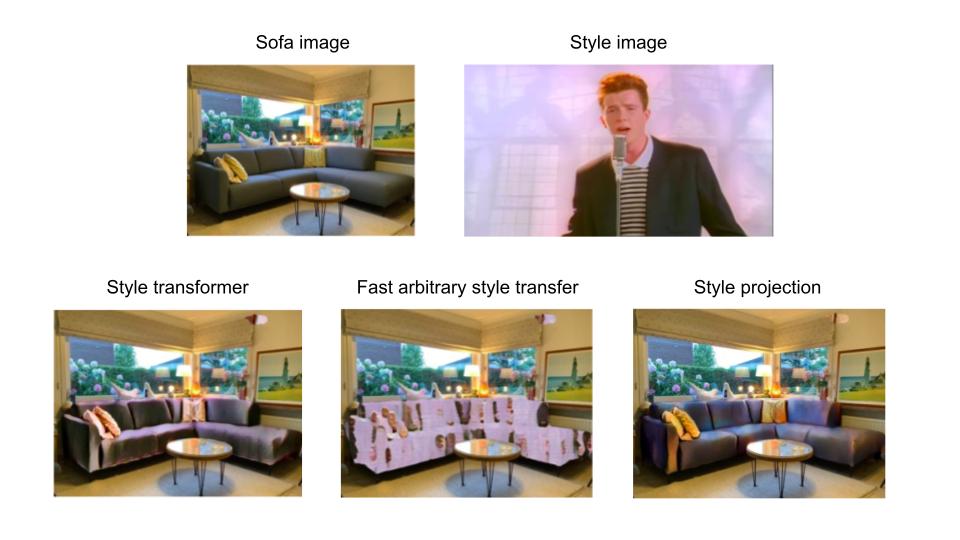
How do I change the sofa?
Since the AI assistant now (more or less) knows how to detect the sofas in the image, we have to teach it how to change the style. Again, we will be using already existing models instead of fully training them ourselves.
- The first model that we applied to our sofas is a transformer model, called StyTr^2 by Yingying Deng and collaborators. This model contains two different transformer encoders to generate domain-specific sequences for content and style, respectively. These encodings are then inputed into a multi-layer transformer decoder to stylize the content sequence according to the style sequence. Transformers have the advantage over other popular style-transfer techniques, such as generative adversarial networks (GANs), that they are very fast in inference. In the specific case of our application, the transformer processes an image in 2.52 seconds (on a NVIDIA Tesla K80 GPU)!
- The second model we use is called fast artistic style transfer and is readily available on Tensorflows model hub by Golnaz Ghiasi and collaborators. The model extends the original implementation of this paper by V. Dumoulin et al. to arbitrary styles. For this they utilise a style prediction network, which uses the Inception-V3 architecture to predicts an embedded vector of the style image. This model is 2 times faster in inference than the transformer, but consequently suffers in believability of the result since the model often looses the 3D nature of the sofa.
- The third model that we implemented can be found on PaddleHub, called stylepro artistic. The model is based on the StyleProNet architecture, which uses a new feature-level style transformation technique, named Style Projection, for parameter-free, fast, and effective content-style transformation. Additionally, the implementation allows to weight the style and original image. This model offers more realistic results than the previous model but takes approximately 7 seconds to process an image.
Of course, many other interesting models exist for this task. A few examples include the Neural Style Transfer code base by Somshubra Majumdar and the styleGAN latent editor by ぱしふぃん , which where both put aside due to longer runtime.
How do I communicate with humans?
If we want to make the AI assistant accessible to the general public, it is always nice to have a neat-looking front end! With little to no experience in HTML or CSS, this seemed as a daunting task at first. Luckily, we found some easy-to-use python packages named Gradio and Streamlit.
I started out with Gradio. Below you can see the general structure of the code I needed for this front end.
import gradio as gr

def style_sofa( Input_image, Style_image, Choice_of_algorithm):

    # Preprocess input images
    resized_img, box = resize_sofa(fix_orient(Input_image))
    resized_style = resize_style(fix_orient(Style_image))

    # Generate mask for image
    mask = get_mask(resized_img)

    # Created a styled sofa
    styled_sofa = create_styledSofa(resized_img, resized_style, Choice_of_algorithm)

    # Postprocess the final image
    new_sofa = replace_sofa(resized_img, mask, styled_sofa)
    new_sofa = new_sofa.crop(box)

    return new_sofa


demo = gr.Interface(
    style_sofa,
    inputs=[
        gr.inputs.Image(type="pil"),
        gr.inputs.Image(type="pil"),
        gr.inputs.Radio(
            ["Style Transformer", "Style FAST", "Style Projection"],
            default="Style FAST",
        ),
    ],
    outputs="image",
    title="🛋 Style your sofa 🛋 ",
    description="Customize your sofa to your wildest dreams 💭!\
                \nProvide a picture of your sofa, a desired pattern\
                and (optionally) choose one of the algorithms.\
                \nOr just pick one of the examples below. ⬇",
    theme="huggingface",
    enable_queue=True,
)

if __name__ == "__main__":
    demo.launch(cache_examples=True)
This results in the front end as shown in the demo below:
However, I later moved to Streamlit. Both packages are similar in functionality, but I found that Streamlit offered more flexibility in the overall lay-out of the application. Below you can see the new and improved front-end I made:
Hosting the application on my own prehistoric laptop was of course never the goal. Luckily I stumbled upon HuggingFace Spaces, which lets me permanently host my application for free! Interested in how I did it? Check it out in my other blogpost!
With the segmentation model, style transfer and front-end complete, we now have an up and running AI assistant! And although his segmentation skills are great, he has a lot to learn before he is ready to help anyone, but I believe SofaStyler can save the world! .... or at least your living room.